 |
 |
Tech Line
Advanced Case Forming Operations
Neck Wall Thickness
The first consideration, is the thickness of the newly formed case necks. When a case neck is reduced in diameter, or moved during case forming, the wall thickness increases. Brass cartridge cases are progressively thicker as you approach the base. This means that when a new case neck is formed from what was previously the parent case's shoulder or body, the neck wall thickness will increase. This can create a dangerous condition if there is not adequate clearance between the neck of the loaded cartridge and the chamber. This clearance can be determined by comparing the measurements of a dummy loaded cartridge and the neck diameter of your chamber. We recommend a minimum clearance of 0.003". If you do not know the neck diameter of your chamber, you should enlist the aid of a competent gunsmith to assist with the project. He will undoubtedly take a chamber cast.
The "Donut"
The second consideration is the formation of a "donut". This is a ring of thicker brass inside the neck of the newly formed case. The donut appears when the neck-shoulder junction of the newly formed case ends up closer to the base than the parent cartridge. This donut must be removed or dangerous pressures will result due to the lack of clearance for the case neck to release the bullet. Again, we recommend a minimum clearance of 0.003".
Neck Thinning
There are two common methods used to reduce the neck wall thickness of cases and remove donuts from their necks. The simplest is neck reaming. Reaming can be performed on a case trimmer or in a special reaming die. The die method is preferred, as the reamer tends to follow the off-center hole in the case neck when reaming on a trimmer.
The preferred method of thinning case necks is to use an outside neck turning tool to remove brass from the outside of the case neck. If the neck turning operation is performed one or two calibers larger than the final desired caliber and a size button is pulled through the neck, it will also remove the donut from the case neck. Neck turning produces a more uniform and concentric case neck than the previously mentioned method of reducing neck wall thickness, reaming.
Some cartridges may require fireforming to produce their final shape before neck turning or reaming can be performed properly. The only safe method we can recommend for this operation, is fireforming cases with an inert filler. For detailed instructions on this method of fireforming cases, see Ken Howell's Designing and Forming Custom Cartridges for Rifles and Handguns.
If you have further questions, please feel free to contact our tech line (607) 753-3331
Bushing Selection
The easiest way to determine the proper diameter bushing is to measure the neck diameter of several loaded or dummy cartridges with an accurate micrometer. (These dummy cartridges can be loaded with your old set of dies or a borrowed set.) Then, simply subtract 0.001" from the cartridge that had the smallest average measurement. This will allow for a slight amount of spring back and create a proper press fit for the bullet.
Another method of determining bushing size, is to measure the neck wall thickness of the cartridge cases with a ball type or tubing micrometer. Double this measurement and add the bullet diameter to calculate the neck diameter of a loaded cartridge. As above, subtract 0.001" from this figure to determine bushing size. This method is the least desirable of the two, as a ball micrometer is fairly expensive and more difficult to read consistently than a conventional micrometer.
If you're starting with new cases, the neck wall thickness can be determined as above with a ball micrometer, or you can seat boat-tail bullets in a few cases and measure their neck diameter. Generally, the neck diameter of new cases is small enough to hold a bullet without sizing. As a last resort, you can measure the neck wall thickness of the cases with a caliper. Be aware that you may not select the correct bushing on the first try when using a caliper to measure neck wall thickness, due to the reduced measuring accuracy of the caliper.
The above methods of determining bushing size require that the cases being sized have a fairly uniform neck wall thickness or have been neck turned. If the neck wall thickness varies more than 0.002", it may be necessary to use a bushing a couple of thousandths smaller than your calculations indicate, and then use a size button in the die to determine the final inside neck diameter.
After loading your first few cartridges, it's a good idea to test the grip that the case neck is exerting on the bullet. The simplest method to perform this test is to press the tip of the loaded cartridge against the edge of your reloading bench with moderate pressure. The bullet should not be seated deeper in the case if you have sized at least one caliber of the case neck. If the bullet is seated deeper in the case, switch to the next smaller size bushing and start again.
It has come to our attention through customer calls and our own use of the bushing style sizing dies that in certain instances, a given neck sizing bushing will produce a case neck diameter that can be several thousandths of an inch smaller than the actual diameter of the bushing. This idiosyncrasy occurs when the neck diameter of the fired case is a great deal larger than the diameter of the neck sizing bushing, such as occurs when factory chambers are on the large side of the tolerance range and the brass is on the thin side. Typically, we have not noticed any problems until the case neck is reduced more than 0.008-0.010".
Solutions include, increasing bushing diameter to compensate and/or the use of a size button. Reducing the neck diameter in two smaller steps by using an intermediate diameter bushing will also help. More concentric necks will also result using this method, as the case necks are stressed less during sizing. Don't forget to properly chamfer the inside and outside of the case mouths and apply a light coating of lubricant to the case necks before sizing.
To determine bushing range for standard calibers see "Bushing Range Chart"
If you have any further questions, please feel free to call our technical support line.
* We recommend that the neck diameter of the largest loaded cartridges measure at least 0.002-0.003" smaller than fired cases measured at the same location. This ensures that there is a clearance of at least 0.001-0.0015" all around the neck of the loaded cartridge. This clearance allows the case neck to expand and safely release the bullet upon firing.
Cartridge Case Denting
When shipped from the factory, all Redding reloading dies are protected with a moisture displacing oil for shipment and storage. During prolonged storage, this shipping oil may migrate to one side of the die and harden. Before using your new dies, they should be cleaned to remove all traces of the shipping oil. Using a quality bore solvent and a brass bristle brush, scrub the interior of the dies out and then carefully dry them. Be sure no solvent remains in the threaded area at the top of the die that may later run down and cause sizing difficulties. An air compressor will greatly assist in drying the dies after cleaning.
A common and obvious cause of shoulder denting is the application of excessive lubricant before the case is run into the sizing die. When using a high-grade case lubricant, such as our "Imperial Sizing Die Wax" or "Original Formula", a light, even coat applied to the body of the cartridge case is all that is necessary. The lubricant can be applied using your fingers or our lubricant pad. Be sure to wipe the excess lubricant off the case shoulder and neck area, leaving only a thin film remaining.
Lubricant can also build up over time in the sizing die body. Each time the die is used, a new layer of lubricant is added. The lubricant then hardens during storage and gradually builds up until the accumulation starts denting the cartridge cases. Clean the die using the above recommended procedure to restore the interior of the die.
Another common cause of cartridge case denting is excessively sizing the case. In this case, the "dent" is actually a "kink." When the sizing die dimensions aren't closely matched to the chamber dimensions, the case buckles away from the die during sizing. This can be caused by an oversize chamber, an undersize die, excessively bumping the case shoulder or any combination of the three.
A properly adjusted full length sizing or body die should be set up to bump the case shoulder 0.002" for most rifles. When sizing cases for an autoloader, bump the shoulder .004" to .006". This figure can be verified with the Redding Instant Indicator Headspace and Bullet Comparator. Using a Redding's Competition Shellholder Set will make achieving precise shoulder bump a snap. See the Redding catalog or website for more information.
To check for excessive case sizing, compare the dimensions of a fired case and one that has been resized. The diameter of the fired case at any point should not be reduced more than 0.005". If you find that your cases are being sized more than this, an oversize chamber or undersize die may be the problem. Sometimes, it may be possible to polish or hone the die to better match the chamber. Check with the factory if you suspect this problem.
A popular misconception is that sizing dies need a "vent hole" to release air or excessive lubricant. It can be easily demonstrated that a vented die will also dent cases if excessive lubricant is applied to the cases, case dimensions are not compatible with the sizing die or the case shoulder is being bumped excessively.
If you have further questions, please feel free to contact our tech line Phone (607) 753-3331
Competition Seaters and COAL
Question: I cannot seat my bullets deep enough in my cases to achieve my desired C.O.A.L. using my Competition Seating Die. What am I doing wrong?
Answer: Due to the complex nature of a Redding Competition Seating Die, additional care should be taken as to be certain that the Die is set up correctly. Please see our “Quick Start Guide” for easy to follow instructions.
Typically, problems achieving the correct C.O.A.L. with a Competition Seating Die are caused by one of the following problems:
1) The large Reamed Sleeve (marked with Cartridge Designation) is not being compressed against the shellholder.
The sleeve should be compressed (NEARLY flush with the outer Die Body) when the Ram/Shellholder is raised to its uppermost position. Please note that the when the sleeve is completely compressed, the Die Body itself will need to be backed away slightly as to not contact the shellholder or damage may result. For more information, please refer to the Competition Seating Die Instructions or the Quick Start Guide.
2) The Set Screw located in the Micrometer Top needs to be adjusted.
The Set Screw mentioned above can be adjusted using the large Allen Wrench that was included with your Competition Seating Die.
Turning the screw Clockwise will lower the screw; allowing the bullet to be seated deeper with the same relative micrometer setting. Conversely, turning the screw counter-clockwise will raise the position of the screw producing a longer C.O.A.L. with the same relative Micrometer setting.
If the C.O.A.L. of your cartridges cannot be adjusted deep enough, try lowering the position of the setscrew. When the setscrew is adjusted, the Die will have to be adjusted from “scratch” in your press as to avoid damage. For more information, please reference the section entitled “Micrometer Adjustment and Zero” in the Competition Seating Die instructions and the Quick Start Guide.
*From the factory, a small amount of adhesive has been applied to the setscrew. As a result, the screw’s initial adjustment will require more force than subsequent adjustments.
Specializied VLD bullet seat stems are available
Click here for a reference chart
Concentricity & Bushing Dies
Our current recommendation, is to select a bushing that is .001 to .002" smaller than the loaded cartridge neck diameter. For example, if the neck diameter of your loaded cartridges is .248", start with a .247 or .246" bushing. We've had to change our initial recommendation, because some of cartridge cases manufactured today have neck walls near the minimum SAAMI thickness. When using brass which is at the thinner end of the SAAMI spec. we have found the bushing which is .001" smaller will provide the best result.
To create precision reloads, you must start with cases of good quality. They should all be from the same manufacturer and lot number. A good measure of case quality is how uniform the neck wall thickness is. Cases with uniform neck wall thickness, will be of uniform thickness all the way to the base. This is important for accuracy, as the cases will expand uniformly upon firing, and contract uniformly when sized. Neck turning helps, but it's only a partial cure, as you can't turn the case wall all the way to the base. The Redding Case Neck Gauge is the preferred instrument for checking neck wall thickness and uniformity. Also note that the concentricity of a fired case only indicates how concentric your firearm's chamber is. It provides you with little or no information on the quality of the cases you're using.
Other factors that can improve concentricity:
- Lube case necks, even with TiN coated bushings.
- Partial size case necks. Sizing 1/2 or 3/4 of the neck seems to be the most popular.
- Try flipping the bushing over. We like to install them with the letters down to start with.
- Trim cases mouths square so they will enter the bushing straight. Don't forget to chamfer the case mouth, inside and out. This is very important as it eases the entry of the case mouth into the bushing, and the bullet into the case mouth.
- Anneal case necks. Cases that have been fired many times work harden and this causes excessive spring-back of the case necks.
Concentricity Problems
The concentricity, or neck runout, of loaded cartridges is an important consideration for reloaders and especially the varmint or target shooter.
There are many factors that can cause or contribute to neck runout during the reloading process and many reloaders who have not dealt with the problem before quickly blame the sizing or seating die.
While the dies may be at fault or have a contributing defect, modern CNC machinery and reamers that cut the body, shoulder, and neck simultaneously make such occurrences rare. Most problems are related to the brass itself and its uniformity both in terms of hardness and thickness and how much it is being stressed in the reloading process.
An entire book can be devoted to this subject, but the amount of stress the brass is subjected to can be your key to finding a problem. If you "feel" any difficulty and /or heavy resistance when resizing your cases this can be a telltale clue.
Excessive difficulty while resizing can indicate any of the following: Poor choice of case lube, failing to clean the die and/or brass, faulty polish inside die, chamber large or at maximum S.A.A.M.I. spec resulting in excessive brass resizing. A large neck diameter in the chamber combined with brass that is thin or excessively turned can cause crooked necks in a hurry. The more brass has to be moved the more its residual memory takes over.
Resistance to pulling your cases over the size button can indicate problems. A "squawk" says "shame on you", you forgot to brush the residue out of the necks. A hard drag can indicate that the top of the size button is not smooth. Don't be afraid to polish the top radius with #600 wet paper, but don't reduce the outside diameter or you can create an excessive bullet fit. Carbide size buttons are now an option also; they have a lower coeffecient of friction.
We have conducted many tests over the years on the various factors contributing to concentricity problems with bottleneck cases. We have repeatedly found a definite correlation between the uniformity of the brass (or lack of it) and the resulting concentricity of the neck to the body of the case.
An interesting experiment also revealed that neck turning of brass that was intentionally sorted as non-uniform, showed little or no concentricity improvement when used in standard S.A.A.M.I. spec chambers. Conversely brass that was sorted and selected for uniformity remained uniform and concentric with or without a neck turning operation.
Another interesting observation can be found in the examination of fired cases that have crooked necks "as fired" right out of the chamber. Usually the chamber is being blamed for the problem.
Looking at the primers under magnification you can usually find a telltale machining mark or other blemish that was imprinted from the bolt face. This will give you an index mark with reference to the chamber. Mark this index mark on the cases with a felt tip marker and go about checking the concentricity. If the runout is random to your index marks the problem is not the chamber. Further examination will show the same correlation with the good and bad brass.
Note that to this point we have not talked about seating dies. That is because 98% of all concentricity problems exist in the brass prior to bullet seating.
Keep in mind that no seating die ever made will correct problems. The best you can do is to obtain a quality seating die that does not add any.
UPDATE: Feb. '96
Redding has now introduced neck sizing dies that use interchangeable sizing bushings in .001" increments. These dies can help reduce overworking of the brass and the resulting loss of concentricity.
If you have further questions, please feel free to contact our tech line below.
Create A “Custom Die” With A Simple Shellholder Change!
Most hunters and many other shooters seeking smooth chambering reloads, full length size their cases each time. Since the interior dimensions of sizing dies are determined by the manufacturer, adjusting the shoulder setback is the only control a reloader has over how much a fired case is sized.
In the past, sizing die adjustment has been made through the trial and error method of rotating the die body in the reloading press. While acceptable results can be obtained using this method, precise adjustments are difficult at best.
Using this method, firm contact with the shellholder was not always possible. As a result, irregularities in brass hardness and thickness, as well as the uniformity and quantity of case lube affected shoulder setback. The resulting headspace variations created can adversely affect accuracy due to non-uniform primer/powder ignition. "Squaring" the die in the press is also precluded with this method of die adjustment.
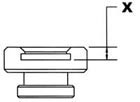 To provide desirable shellholder-to-die contact during sizing, without excessively setting the case shoulder back, Redding now offers shellholders that are in increments of .002" thicker than the industry standard. The nominal thickness for industry standard shellholders is .125". (See dimension X on the shellholder diagram.) Our new Competition Shellholder Set includes five shellholders that are thicker than this in increments of .002". Therefore, the set includes shellholders that are marked +.002, +.004, +.006, +.008 and +.010, which is the amount the shellholder will decrease case to chamber headspace.
To select the proper shellholder for your particular firearm's chamber, start with the shellholder marked +.010. The shellholder should be adjusted to make firm contact with the bottom of the sizing die during the case sizing operation. Resize a case and try it (unprimed and empty) in the chamber of your firearm. If the empty case does not chamber or chambers with difficulty, switch to the shellholder marked +.008 and repeat the process. Stop at the shellholder that allows the firearm's action to close freely. Your cases are now being sized properly to fit your chamber with a minimum amount of headspace.
Dealing with Headspace by Todd Spotti
 Headspace is one of those concepts that is both very simple and yet is extremely important to achieve gilt edged accuracy. For bottlenecked cartridges, headspace is simply the distance between the head of the cartridge case (the end where the primer is inserted) and the front/face of the firearm's bolt when the case's shoulder is positioned against the front of the chamber.
Firearms manufacturers have a problem in that the chambers in their guns have to be long enough to accommodate all of the cartridges of a given kind made by literally hundreds of manufacturers from around the world - all of which will vary slightly in length due to normal manufacturing tolerances. Consequently a certain amount of "slop" is built into the length of chamber to accommodate those differences. However, that slop can reduce accuracy.
The goal of every conciencious reloader should be to use proven and practical reloading proscedures in order to ensure that the bullet/case combination is as perfectly aligned with the center of the bore as possible. The more centered up the cartridge, the more accuracy we can expect. However, if the cartridge is laying loose in the bottom of the chamber because of a generous headspace dimension, it's obvious that the bullet will be pointed closer to the bottom of the bore rather than the center. Consequently, accuracy conscious shooters will want to reduce headspace to the absolute minimum i.e. where the shoulder of the case is against the front of the chamber wall and the bolt/breech face of the firearm is very close to or even lightly touching the head of the case. We can do this by adjusting the shoulder of our fired cases in the sizing process. However be aware that when we do so, we're customizing those cases to a precise fit in one particular gun. This means that those cases will probably fit only in that gun and in no other.
Headspace is like Goldilocks porridge. It has to be just right for the best accuracy. Too much is bad and too little is also bad. So how do we know when we have too much headspace? There are a couple of obvious tell tale signs on our fired cases that are sure fire indicators. The first is a protruding primer. If, after firing, you see the primer is backed out of the primer pocket, even a little bit, you have excessive headspace. Remember, the top of the primer in an unfired case is supposed to be located just below the case head after it has been seated. If it's sticking out after the shot has been fired, the case is too loose in the chamber.
The second indication of too much headspace is a excessively stretched case. When the powder is ignited, the case is expanding in all directions, including front and rear. Brass does have a limited amount of "springback", but when the amount of headspace exceeds the ability of the case to springback, the case will be permanently stretched and weakened. Stretched cases can be easily identified by a bright, light colored ring located just forward of the head. The case at that point has been stretched dangerously thin. Those cases should be thrown away immediately as they will come apart at that point sooner or later. Case head separations can sometimes be very nasty.
The ideal amount of headspace for the best accuracy is zero. In other words, all space behind the case head has been eliminated. When the bolt face is just touching the case head or is just, behind the case head, two good things are happening. One - the cartridge is aligned as well in the chamber as is possible. Two - when the firing pin hits the primer, the case will not be able to slide forward under the impact and will stay firmly in place. Consequently, the full force of the firing pin's blow will be delivered against the primer cup insuring efficient ignition. However, there is such a thing as going too far in our efforts to eliminate excess headspace.
One problem that many shooters using hard recoiling cartridges experience occurs when the headspace is less than zero. In other words, a hot load is stretching the case lengthwise to the point that if the case is just neck sized, it'll be a difficult fit in the chamber. In such cases, the shoulder has been moved so far forward that the bolt handle either won't go down or it will go down only with some degree of difficulty. These cases can also be identified by scrape marks on the head as a result of the bolt face rubbing that area under pressure as its being turned. You might also see brass scrapings on the bolt face itself. The cartridge is actually being inserted into the chamber with a crush fit. Under those circumstances, case life will be significantly reduced - especially primer pockets.
One way we can achieve an ideal headspace with these cases with shoulders that are too far forward is by adjusting our resizing die so that the case's shoulder is moved back to the ideal headspace location. To do so, raise the ram of your reloading press to the top position with the shellholder installed. Take your full length sizing die and screw it down to the point where it's touching the shellholder. Now back off the die by about a half turn. Run a lightly lubricated fired case into the die, and then try chambering it in your gun. If the case does not chamber, or chambers only with difficulty, screw the die down just a bit more (1/8th turn) and size the case again and rechamber. Keep repeating this procedure until the bolt on your gun just closes freely or as I prefer, with a very slight bit of resistance. Now lock the die in place. This is the classic method for adjusting headspace.
A good alternative is to use Redding's Competition Shellholder Kit. The kit is composed of five thicker* than normal shellholderswhich are packaged together in a neat little plastic case. A normal shellholder is .125" thick. The five competition shellholders are thicker* in increments of two thousandths of an inch i.e. +.002", +004", +.006", +.008", and +.010". Each shellholder is stamped with its increase in depth, and they are Black Oxide coated so they can't be confused with a regular .125" shellholder.
Using them is very easy. Start with the +.010" shellholder. Install on the press's ram and raise to the top position. Screw down the sizing die to the point that it's making firm contact with the shellholder. When that happens, the die is now being "squared" or aligned with the shellholder.
Lock the die in place. OK, take a fired, lubed case and run it into the die and then try chambering it into your gun. If it doesn't chamber, go to the +.008" shellholder and repeat the "squaring", resizing, and chambering procedure. Keep repeating until the case chambers easily. Cases sized with that shellholder now have the optimum headspace for the best case alignment.
One last note. If you size more than one type of case with these shellholders, keep a record of what shellholder to use for which cases. Also if you switch case brands, or even case lots, double check to see if the shellholder and die setting is still good. Differences in brass thickness and brass hardness can make a difference. This also applies sometimes even if you switch brands of lubricant. Strange but true.
Once you have your case's headspace squared away, you can be assurred that the chamber fit of your reloaded ammo will be "just right". Goldilocks would be proud.
*( Editor"s Note: the shellholders are actually the same thickness but the seat on which the case rests is machined deeper into the body of the shellholder giving the mechanical effect of a shellholder which would be thicker from the casehead to the top of the shellholder where it contacts the base of the die. By using this method, there is no need to readjust the die between the 5 different shellholders to accomplish the desired shoulder set back.)
Redding Die Lock Rings
There have been some concerned comments on chat boards as well as customer comment sections regarding an un-based fear that the Steel Set Screw in a Redding Lock ring can damage the threads of the die.
Please be advised, that in all Redding dies shipped from the factory the lock ring has a piece of Bismuth captured behind the set screw which engages the die threads as the set screw is turned in. This is more costly but far more effective than a simple brass screw, which can be easily stripped and therefore made unusable. Redding uses steel on steel for strength but places a piece of lead between the set screw and the die threads as a buffer to protect the threads from damage and provide a secure lock-up.
If you have further questions, please feel free to contact our tech line (607) 753-3331
Scratched Cases: Causes and Cures
As a part of their final processing, Redding dies are cleaned with an ultrasonic cleaner to remove any foreign material which may remain from the manufacturing process. This is the same procedure used to super-clean aerospace parts, hydraulic valve bodies, and the like.
Case scratching problems can usually be traced to the reloading area and some of the equipment that may be in or near it. A few guidelines that will help are listed below:
- Keep the abrasive dust and particles from spent primers cleaned up and away from all equipment.
- If you have a small bench grinder, it should be kept away from the reloading bench, preferably in another room.
- Loading on the range, especially in windy or dusty conditions, can introduce cleanliness problems that can be hard to manage.
- Case tumblers are another potential source of problems. While the cases may come out shiny, they will actually have a thin film of abrasive residue on them. Cases should be thoroughly cleaned and/or washed before going into the dies.
- Nickel plated cases are often associated with die scratching problems. Small particles of the hard nickel plating may be present from trimming and/or deburring operations and can find their way inside the dies.
- It is important to understand that foreign material does not have to be hard to cause problems. Brass chips from trimming and deburring can find their way inside the resizing die, where they can literally be welded to the inside of the die under the extreme pressures generated by full-length resizing. When this happens, the "brass against brass" action will gall the cases, leaving an apparent scratch. The condition will rapidly worsen as brass continues to build up.
Cleaning Your Dies
We are often asked, "How should I clean my dies?" The answer is to use the same procedures, with the same equipment and solvents, that you use to clean the bore of your rifle or handgun. Use the same diligence and effort as well, since the brushing and copper solvents will work well on any brass deposits that may have accumulated inside the die.
Another question that comes up is, "Can I do any internal polishing?" Again, the answer is, "Yes, with care!" The best arrangement is to chuck the die in a lathe, after stripping it down and removing the internal parts. Use #400 or #600 wet/dry auto body paper wrapped around a small wooden dowel. Keep the paper wet with a thin petroleum product with the consistency of WD-40 or kerosene. Using this method, you will easily be able to remove any foreign material or brass build-up from the inside of the die.
Since our dies are heat-treated to approximately 62 Rockwell C, you can polish for a long time without changing the internal dimensions. Do not use ordinary sandpaper or anything coarser than #400, as you will scratch the interior of the die surface and void the lifetime warranty.
It is very important to give the dies a thorough cleaning, after the polishing operation. They should be thoroughly washed, flushed, and wiped several times. Again, just as when cleaning your rifle, check the dies for cleanliness with several wet patches and then lube and dry patch them.
In summary, the name of the game when it comes to avoiding scratched cases is cleanliness! A little attention paid to keeping your reloading area clean, and periodically cleaning your dies, will insure that they give you years of trouble-free service.
If you have further questions, please feel free to contact our tech line (607) 753-3331
Seating Depth Variation
We have designed the seat stem in our Competition Seating Die to contact the bullet ogive as far down as possible. Our Competition Seating Die features a bullet guide that is only .0005-.001" larger than bullet diameter. This tight fit between the bullet guide and bullet ensures that the bullet is seated straight in the case neck. It also limits how far down the ogive the seat stem can contact the bullet. If the ogive of your bullets aren't uniform, you may notice a slight difference in seating depth. Generally, this isn't a problem as modern bullets are very uniform. In rare instances, when using inexpensive bulk bullets, you may find that the bullets were made on several different machines and then blended.
If your loading press is worn, the ram may not stop in exactly the same spot each time you raise it. Obviously, this will cause variations in bullet seating depth. Although our instructions warn against it, raise the shellholder and adjust the outer, threaded die body to make light contact with the shellholder. (Make sure you keep the contact light, so you don't damage the die.) This creates a "dead length" seating chamber that is unaffected by where the shellholder stops. The only disadvantage to using the die adjusted this way, is that it may be awkward to read the micrometer if it ends up on the back side of the die.
Inadequate or excessive neck tension can also cause bullet seating depth variations. If you're using a bushing style sizing die, make sure you've selected the correct diameter bushing to size the case necks. Our current recommendation, is to select a bushing that is .001" smaller than the neck diameter of your loaded cartridges. (See the "bushing selection" newsletter in the "Tech Line" section of our website for more information.) As cases are fired over and over, their necks become progressively harder. This can cause the necks to "spring-back" excessively when they are sized, which reduces the neck tension on the bullet. Either anneal the case necks after several firings, or discard the cases and start with new, soft ones.
Heavily compressed loads can create problems when seating bullets. Our Competition Seating Die is not a powder compression die. The excessive force required to seat a bullet on a compressed load can damage the die and may cause seating depth variations. Switching to a faster burning or ball powder may eliminate the need to excessively compress the powder charge.
If you have any further questions, please feel free to call our technical support line at 607-753-3331.